|
<< Click to Display Table of Contents >> Custom Word Document |
  
|
|
<< Click to Display Table of Contents >> Custom Word Document |
|
Available in v18 and higher
Available in Standard
Updated in v18.0
DOCX printing uses custom word document templates to populate reports with data from Belt Analyst™. Any user can customize a template to change various aspects of the printout.
Creating your own custom or modified template is simple. Navigate to Defaults > Path Settings. Open the Printing Templates folder. These folders contain the default templates installed with the program.
Copy the folder with the templates you wish to use as a starting point, and paste it in the Path Templates directory. You now have a set of custom templates. Rename this folder whatever you would like to designate your custom templates.
Template documents are formatted specifically for importing data from BA when a user chooses to print. The specific formatting of the items within the template creates a "map" for BA to populate data when printing.
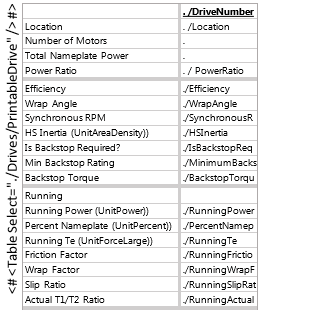
As an example of how data is populated from BA when printing, Open the drives template from your newly copied over folder. Within the template, most tables are placed within rotated textboxes. The row labels within the tables can all me modified to custom values as the user sees fit. Please note that within these text cells, the formatting of the text tells Belt Analyst how to populate the data within the table:
•Any textbox cell with the “./ExampleValue” formatting indicates that the cell will be populated with a specific piece of data from Belt Analyst. This formatting should not be altered.
•Any textbox cell with “(UnitValueExample))” will be populated with a unit output from Belt Analyst. Note the additional “)” parenthesis at the end of the text which is required for Belt Analyst to populate the unit correctly.
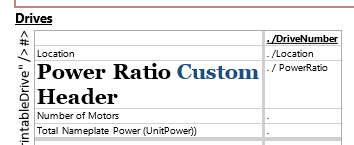
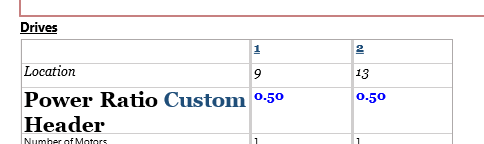
As an example of re-arranging outputs within the template, modify your custom template so that the Total Nameplate Power prints above the Number of Motors value, move the location line above the label value using Word's table editing features as shown below.
You can also change the wording of a header for a value. Overwrite the existing value with your desired header text.
Font style, color, and size are also all changeable. Row and column sizes can be made larger or smaller according to your design preferences.

The font style and size are also editable for the values, and will affect their value on printout. If you see values cut off, as with the Drive Number value above, do not worry as your changes will still apply unless you have actually edited what the text says. Be sure to save your changes in order to see them applied when printing!
Note: the bold/non bold blue and warnings on values will overwrite changes in the output if they apply.
When changing the size of the rows or columns, be sure to adjust the containing text box's size if needed. With the changes made above, you would need to make the text-box vertically longer.
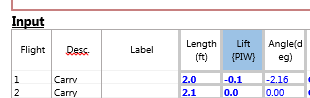
In some templates, tables will not appear to be rotated. One such example is the Input Geometry Template. Grab a copy of this template and put it into your custom templates folder.
The table itself can be modified in any way a word document table can be modified. Shading, line thickness and line color are all examples of word table editing customization which can be done.
You may have noticed the (UnitValue)) format applied to these headers. Changing the UnitValue text within the brackets will change the unit printed next to the header in the template. You can change the style, font and color of these values as well. Please note that the final right parenthesis “)” functions as an end character and must be left immediately at the end of the “UnitValue” text. As an example, you can customize the unit output to be enclosed in “{ }” by making the following change. Note that the right parenthesis “)” still exists immediately next to the “UnitValue” text.
Result:
Note: if you decide to print with a selection of custom templates and are missing some, the program will automatically use a template from the default folder.
There is another kind of template which utilizes multiple tables in textboxes overlapping each other. This template demonstrates advanced techniques for customization. Several templates have textboxes containing tables that are 'underneath' other tables or images. To edit these, click on them, and select the 'In Front Of Text' Option from the menu that appears near the textbox in word after you click on it. You will want to return them to the 'Behind Text' state when you are done editing using the same menu.
The Summary Template is a good example of this. The textboxes are overlapping to achieve the effect of the units being far from the header. Any modifications made to one of these textboxes should also be made in the other for consistency.
Images containers in the templates look like this

and may have their size adjusted, though the image may look stretched or squished. No other changes to image containers or image container removals are recommended. A user’s own images, however, may be inserted elsewhere in the document and images that are not containers can be modified.
Each template has a header and footer which can be customized. The text style, size, and color can be changed, and the geometry of the red line above can be replaced with your own, edited for different geometry, and or re-colored. Text can be modified just like in tables. The values that will be populated are wrapped in '<#' and '#>' text. These values will populate with whatever style or color you make them.

The logo can be replaced with your own using the Custom logo path feature in Belt Analyst.
![]()
It can also be changed by deleting the image content control in the template header and replacing it with the desired image.
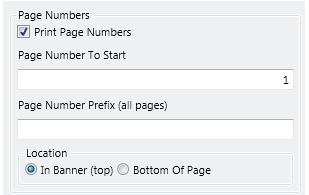
There are settings in the Report Tab for adjusting page numbering and logo from within BA. If you wish to implement your own custom page numbering, you can insert the page number using word in your custom templates, and when you print your templates uncheck the ‘Print Page Numbers’ checkbox in the Report Tab.
Some Additional rules for creating a custom template are as follows:
•You cannot put data from a rotated textbox table into a non-rotated textbox table and expect it to work.
•You cannot put ./Value information from another template into another template and expect it to work.
•You cannot add an additional column (rotated textbox tables) or row (non-rotated textbox tables) and expect it to work.
•Double check that the changes you made will not be cut off from an improperly sized textbox.
•Some textboxes are 'underneath' images and will be more difficult to click on to access. You can send the images back to make this easier.
•You can repeat ./Value information inside the same template.
•You can remove ./Value information from any template.
•In order to reset all default templates in the default folders to their original state, navigate to Defaults > General and click 'Reset all templates'. This will not overwrite templates in your custom folders, so long as they do not have the same name as any of the default folder names.
•You can remove or edit the page numbers, however you will want to remove or edit them for each template.