|
<< Click to Display Table of Contents >> Drive Target Tensions |
  
|
|
<< Click to Display Table of Contents >> Drive Target Tensions |
  
|
Available in v12 and higher
Available in Pro
Updated in v15.1
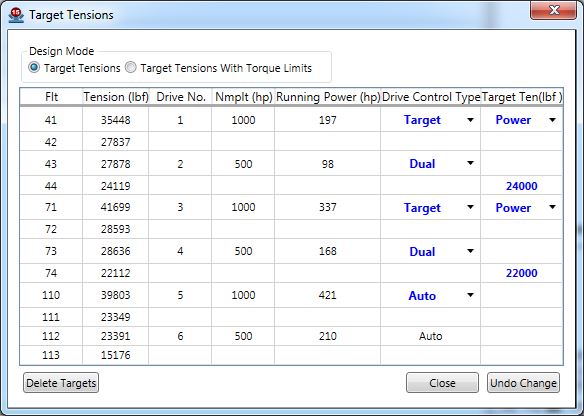
The amount of power supplied by each drive in a multiple drive arrangement can be controlled by Target Tensions. With this approach, drives on either side of the belt (such as, Tripper or Booster drives) can be controlled by the setting of a target for belt tension at a point just past the drive.
The target tension screen is accessed through the Design Options > Auxiliary > Target Tensions menu.
There are two options inside the Target Tensions window: normal Target Tensions and Target Tensions with Torque Limits.

The display shows the inputted:
•Drive locations
•Belt tensions near these drives
•Nameplate power installed.
•Running power base on currently defined drive control scheme.
The control options are:
•The drive(s) designated to "Auto" will supply the power not supplied by the other drives on the conveyor.
![]()
There must be at least one drive on the conveyor running in "Auto" or the program will not be able to calculate running power.
•The drive(s) designated "Target" will be controlled by inputting the setting of a target for belt tension at a point just past the drive. The user selected target tension is input in the "Target" column in the row after control indication. The user selects whether these inputs are used in Power conditions, Regenerative conditions, or Both.
![]()
•Dual "Target" tension drives can be selected so the target tension is at a point just beyond the second drive.

There are arrangements of target and auto drives that do not result in a stable calculation, so the results must be evaluated and perhaps the arrangement modified.
•The drive(s) designated "Fixed" will be controlled by inputting the fixed power applied at this location. The user selected power is input into the "Running" column.
![]()
Target Tensions with Torque Limits enables the user to add the min and max percentage of power for each drive. To access the Target Tensions with Torque Limits just click on the toggle inside the form.
![]()
The last two columns represent the Min and Max Power that the user can enter. The value is represented in the percentages.

Buttons at the bottom of the Target Tension screen can be used to:
![]()
•Press Close to accept the selected drive control arrangement and close the editing screen.
•Press Delete Targets to eliminate target tension control and return drive control to the power ratio input on the Drive Tab.
•Press Undo Changes to return to the original target tension settings and continue editing.
When target tensions are employed, a note will appear on the Drive Tab. Auto selection of drive is not allowed when target tensions are set.
![]()